
If you are choosing a DSLR for beginners in 2026, the best answer is usually not the newest camera. It is the camera that makes exposure, focus, and lens choice easy enough to practice every week. For most new photographers, I would start with a Nikon D3500 kit if you can find one in clean condition, a Canon Rebel T7 if price matters most, a Canon Rebel SL3 if you want the smallest DSLR with strong Live View autofocus, or a Nikon D5600 if you want more room to grow.
That framing matters because the beginner DSLR market is not crowded with fresh releases anymore. You are often comparing new old stock, used bodies, refurbished kits, and mirrorless alternatives at the same price. A good starter DSLR should still be simple to carry, cheap to upgrade with lenses, and direct enough to teach you what aperture, shutter speed, and ISO actually do.
Contents
- Best DSLR cameras for beginners in 2026: quick picks
- How to choose your first DSLR camera
- Best beginner DSLR cameras: model-by-model advice
- Understanding sensor size and image quality
- Kit lenses versus investing in better glass
- Autofocus systems explained simply
- Memory cards and storage considerations
- Learning modes and shooting progression
- Viewfinder versus live view shooting
- Considering mirrorless alternatives
- Budget considerations and long-term value
- Building skills alongside equipment knowledge
- Where to find deals and save money
- The importance of learning resources
- Maintenance and care for longevity
- Final verdict: which beginner DSLR should you buy?
- Beginner DSLR FAQ
Best DSLR cameras for beginners in 2026: quick picks
| Camera | Best fit | Why it makes sense for a beginner |
|---|---|---|
| Nikon D3500 | Best overall starter DSLR | Excellent battery life, a light body, strong image quality, and a Guide Mode that actually helps you learn. |
| Canon EOS Rebel T7 / 2000D | Best cheap DSLR camera for beginners | Simple controls, a 24.1MP APS-C sensor, and access to Canon’s huge EF and EF-S lens ecosystem. |
| Canon EOS Rebel SL3 / 250D | Best small DSLR for beginners | A compact body, Canon color, Dual Pixel CMOS AF in Live View, and 4K video if you want hybrid shooting. |
| Nikon D5600 | Best DSLR camera starter for fast learners | A tilting touchscreen, better autofocus coverage than basic models, and wireless sharing without jumping to a pro body. |
How to choose your first DSLR camera
The best beginner DSLR cameras share a few traits that matter more than headline specs. You want a body that feels natural in your hands, a menu system that does not punish mistakes, an 18-55mm kit lens that lets you practice immediately, and a lens mount with affordable upgrades when you are ready.
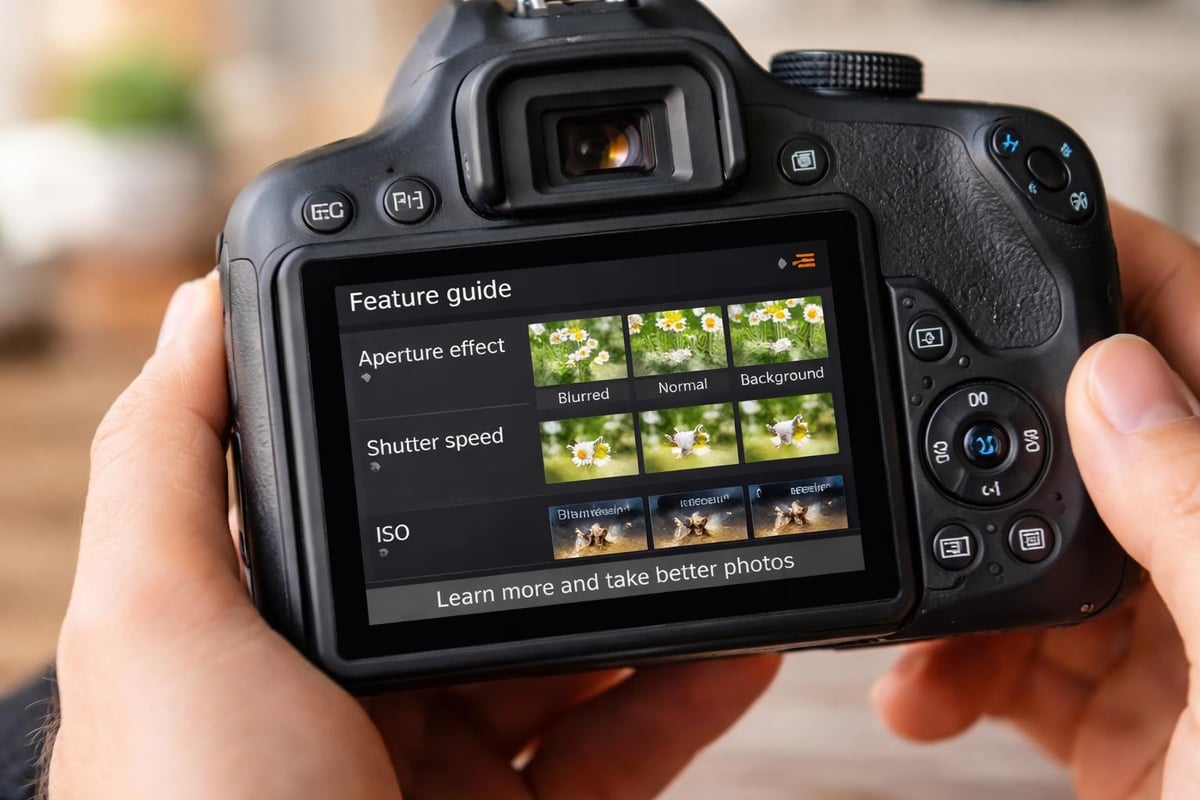
Guided modes are not a gimmick for a first DSLR. A proper guide mode or feature guide lets you see how shutter speed, aperture, and ISO change the image before those words feel natural. That is much more useful than buying a more advanced body and leaving it in Auto because the controls slow you down.
Buy the camera you will actually carry
Weight and grip design influence how often you will practice. I have seen too many beginners buy heavy professional models that spend more time in the closet than around their necks. A camera that fits comfortably in your hands and does not cause fatigue after an hour of shooting will teach you more than a better camera that stays at home.
Battery life deserves serious consideration too. Nothing kills learning momentum faster than a dead battery halfway through a practice session. The Nikon D3500, for example, delivers approximately 1,550 shots per charge, which means you can spend entire weekends shooting without worrying about power.
The viewfinder is another reason DSLRs still work well for beginners. Optical viewfinders show you the scene through the lens with no display lag and very little battery drain. That direct connection to your subject helps with timing, composition, and learning to trust what you see.
Best beginner DSLR cameras: model-by-model advice
These picks represent different beginner needs rather than a single spec-sheet ranking. Start with the camera that matches how you plan to shoot, then compare current kit pricing and condition.
Nikon D3500
Nikon designed the D3500 specifically for people who have never held a DSLR before, and it shows in the user experience. The Guide Mode turns the camera into a practical teacher, showing which settings to adjust for portraits, action, low light, and background blur.
Image quality from the 24.2-megapixel sensor is still more than enough for large prints, cropping, and serious learning. The body weighs just 365 grams, so it is easy to carry all day, and the battery life is the best reason to choose it over many competing starter cameras.
Buy the D3500 if you want the least distracting path into still photography. Skip it if you know you want a fully articulating screen, stronger video features, or more advanced autofocus coverage from day one.
Canon EOS Rebel T7 / 2000D
The Canon Rebel T7 is one of the most affordable entry points into DSLR photography. Its 24.1-megapixel APS-C sensor gives you enough resolution for prints and cropping, and the simple control layout keeps the camera from feeling like a technical exam.
Canon built this camera with simplicity as the guiding principle. The Feature Guide explains settings in plain language, which helps you shoot while learning instead of studying the manual for weeks before pressing the shutter button.
The 9-point autofocus system is basic, but that is not automatically a problem for a beginner. It teaches you to place your focus point deliberately, recompose carefully, and understand when the camera has missed the subject. Those habits matter on every camera you will own later.
Canon EOS Rebel SL3 / 250D
The SL3 is the Canon DSLR I would look at first if you want a beginner camera that also feels comfortable for video, family travel, and screen-based shooting. At 449 grams with battery and card, it feels much smaller than traditional DSLR bodies without giving up the optical viewfinder.
Canon’s Dual Pixel CMOS AF is the key advantage here. It makes Live View autofocus feel much closer to a mirrorless camera, which smooths the transition for anyone coming from a phone. The fully articulating screen also helps with low angles, overhead shots, and simple video work.
The 4K video mode has limitations, including a crop, so I would not buy the SL3 as a pure video camera. As a first DSLR for someone who wants photos first and useful video second, it remains one of the most beginner-friendly Canon choices.
Nikon D5600
The D5600 sits above the D3500 in Nikon’s beginner lineup. It is still approachable, but the 39-point autofocus system, articulating touchscreen, and stronger connectivity make it a better fit if you expect to advance quickly.
Connectivity features set this camera apart from cheaper alternatives. Built-in Wi-Fi and Bluetooth make image transfers easier, which matters if you want to share work from a phone without waiting until you get back to a computer.
The D5600 is the better Nikon choice if you want more flexible composition and autofocus without buying a larger enthusiast body. The D3500 is simpler and cheaper; the D5600 gives you more room to grow.
Understanding sensor size and image quality
The sensor captures light and converts it into the digital image you see on screen. All the great DSLR cameras for beginners use APS-C sensors, which measure approximately 22.5 x 15mm. This size offers an excellent balance between image quality, lens size, and cost.
Full-frame sensors measure 36 x 24mm and appear in professional cameras. They gather more light and produce shallower depth of field, but the cameras and lenses cost significantly more. For beginners, APS-C provides everything you need to learn photography fundamentals.
Crop factor and lens selection
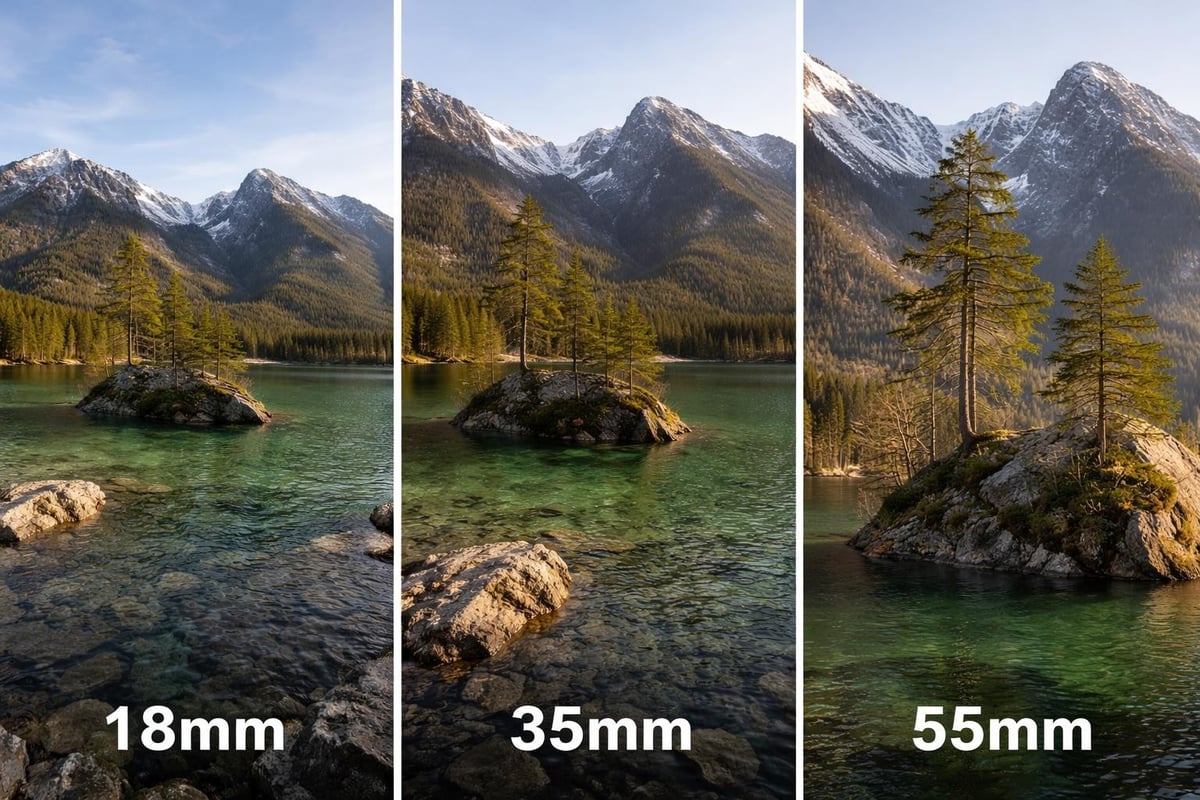
APS-C sensors have a crop factor of approximately 1.5x (Nikon) or 1.6x (Canon). This multiplier affects the effective focal length of lenses you attach to the camera. A 50mm lens on a Canon APS-C camera behaves like an 80mm lens on a full-frame body.
Understanding crop factor helps you choose appropriate lenses for different subjects:
- 35mm lens becomes roughly 50mm (ideal for street photography and environmental portraits)
- 50mm lens becomes roughly 80mm (perfect for traditional portraits)
- 18-55mm kit zoom becomes roughly 29-88mm (versatile everyday range)
This crop factor actually benefits beginners interested in wildlife or sports photography because telephoto lenses gain extra reach without additional cost.
Kit lenses versus investing in better glass
Every camera manufacturer bundles their entry-level DSLRs with an 18-55mm kit lens. These lenses receive criticism from photography communities, but they serve an important purpose for beginners.
The 18-55mm range covers wide-angle to short telephoto focal lengths, letting you photograph landscapes, portraits, and everything in between. Image quality from modern kit lenses exceeds what these lenses produced even five years ago. You can create sharp, professional-looking images if you understand the lens’s limitations.
Kit lenses typically have variable maximum apertures (f/3.5-5.6), which means they don’t gather as much light as more expensive lenses. This limitation becomes noticeable in low-light situations where you need faster shutter speeds or lower ISO values.
Should you buy the camera body only and invest in better lenses immediately? For most beginners, the answer is no. The kit lens lets you discover which focal lengths you use most often before spending money on specialized glass. You might think you need a wide-angle lens until you realize all your favorite images fall in the 50-85mm range.
When to upgrade your lens collection
Signs that you’ve outgrown your kit lens include:
- Consistently shooting at either the wide or telephoto end of the zoom range
- Frustration with low-light performance requiring high ISO values
- Desire for more background blur in portraits
- Needing faster autofocus for action photography
Your first lens upgrade often makes more difference to image quality than upgrading your camera body. A 50mm f/1.8 lens costs between 100 and 200 dollars but transforms your portrait and low-light photography capabilities. The wide f/1.8 aperture gathers far more light than your kit lens and creates beautiful background blur.
If you’re budget-conscious and want to explore your options further, check out our guide on the best cameras under 700 dollars which includes detailed comparisons of DSLRs and mirrorless alternatives at various price points.
Autofocus systems explained simply
Autofocus determines whether your images appear sharp or frustratingly blurry. DSLR cameras use phase-detection autofocus when you’re looking through the viewfinder, which works extremely quickly and accurately in good light.
Phase-detection systems use dedicated sensors below the mirror to calculate focus distance. The number of autofocus points indicates how many areas across the frame can achieve focus. Entry-level cameras typically offer between 9 and 45 points.
More autofocus points don’t automatically mean better performance. The coverage area and sensitivity of those points matter equally. A camera with 11 well-placed, sensitive autofocus points often outperforms one with 45 points clustered in the center of the frame.
Single-point versus area autofocus modes
Understanding autofocus modes helps you capture sharp images in different situations:
- Single-point AF gives you complete control over the focus location by selecting one specific autofocus point
- Dynamic-area AF tracks moving subjects by starting with your selected point and switching to nearby points if the subject moves
- Auto-area AF lets the camera choose which autofocus points to use based on what it thinks is the subject
Beginners often start with auto-area mode because it feels easier, but learning single-point AF early teaches better composition habits and gives you precise control over what appears sharp in your images.
Memory cards and storage considerations
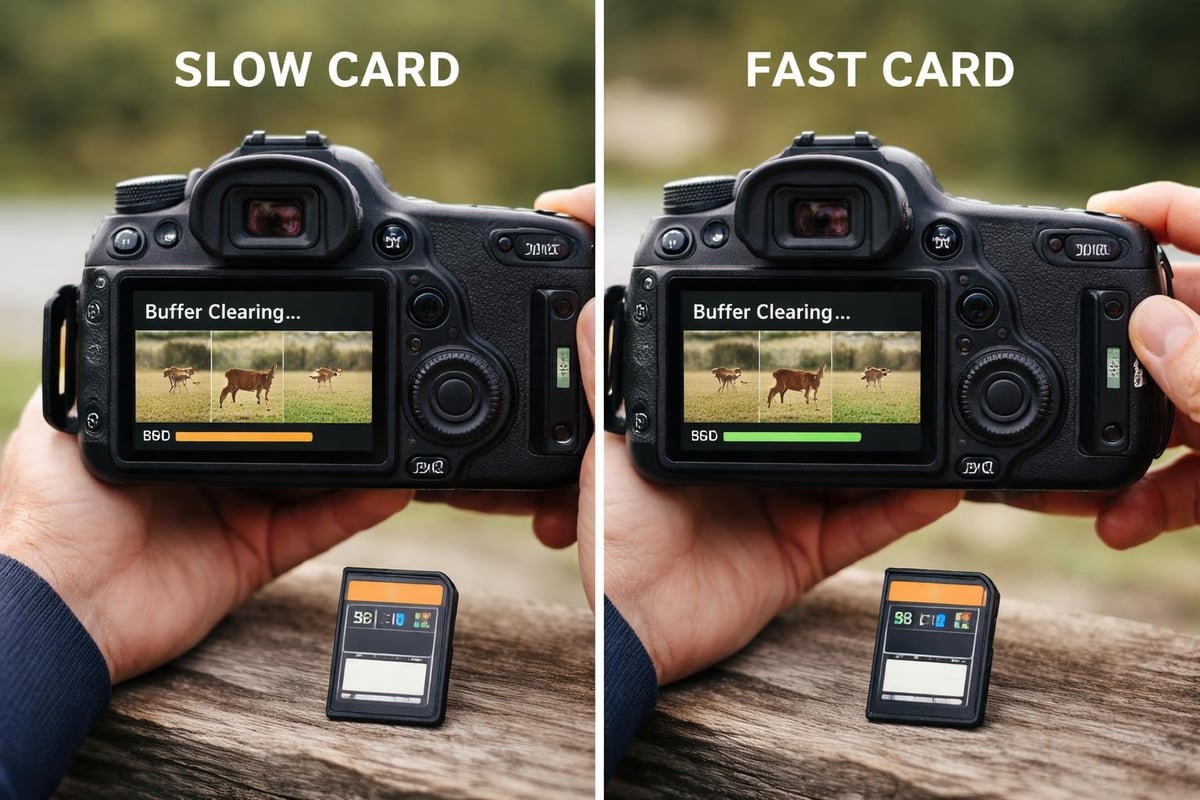
Memory card selection seems trivial until you miss important shots because your card can’t keep up with the camera. DSLR cameras for beginners use SD cards, but not all SD cards perform equally.
Speed class ratings indicate how fast data writes to the card. For photography, a Class 10 or UHS-I card with a speed rating of U1 handles continuous shooting adequately. Video recording, especially 4K, requires faster cards rated U3 or V30.
| Speed Class | Minimum Write Speed | Best For |
|---|---|---|
| Class 10 | 10 MB/s | Basic photography |
| UHS-I U1 | 10 MB/s | Standard photo shooting |
| UHS-I U3 | 30 MB/s | 4K video, continuous shooting |
| V30 | 30 MB/s | 4K video, high-speed bursts |
Card capacity depends on your shooting habits and workflow. A 32GB card holds approximately 1,000 RAW files or 5,000 JPEGs from a 24-megapixel camera. Starting with two 32GB cards costs less than one 64GB card and provides backup security if one card fails or gets lost.
Learning modes and shooting progression
Great DSLR cameras for beginners include shooting modes that gradually introduce manual controls without forcing you to understand everything immediately. The mode dial becomes your progression path from automatic to fully manual shooting.
Scene modes (portrait, landscape, sports, macro) configure all camera settings for specific situations. These modes teach you which combinations of aperture, shutter speed, and ISO work for different subjects, even if you don’t understand why yet.
Moving from auto to manual control
The typical progression follows this path:
- Start with Auto mode to understand basic camera operation and composition
- Move to Program mode (P) which selects exposure settings but lets you adjust them
- Graduate to Aperture Priority (A/Av) to control depth of field while the camera sets shutter speed
- Try Shutter Priority (S/Tv) when you need to control motion blur
- Eventually use Manual mode (M) for complete creative control
Rushing to manual mode doesn’t make you a better photographer faster. Understanding one variable at a time builds solid knowledge that sticks. You can create excellent images in aperture priority mode for years before needing full manual control.
According to insights from TechRadar’s beginner camera guide, cameras with excellent auto modes and gradual learning features help new photographers build confidence while developing technical skills.
Viewfinder versus live view shooting
DSLRs offer two ways to compose images: looking through the optical viewfinder or using the rear LCD screen in Live View mode. Each method has specific advantages depending on your subject and shooting style.
Optical viewfinders show you exactly what the lens sees with no processing delay. This direct view helps you track fast-moving subjects and react to changing moments instantly. The viewfinder also blocks ambient light, making it easier to see your composition in bright sunlight.
Live View mode displays a digital preview of your image on the LCD screen, showing exactly how exposure settings affect the final result before you press the shutter. This preview capability accelerates learning because you see the consequences of changing aperture or ISO immediately.
The tradeoff involves autofocus speed. Most entry-level DSLRs use slower contrast-detection autofocus in Live View compared to the phase-detection system active when using the viewfinder. Cameras like the Canon SL3 with Dual Pixel AF minimize this performance gap.
Considering mirrorless alternatives
While we’re focusing on great DSLR cameras for beginners, you should understand why mirrorless cameras have gained significant market share recently. The fundamental difference lies in the mirror mechanism.
DSLRs use a mirror to reflect light from the lens into the optical viewfinder. When you press the shutter, the mirror flips up, allowing light to reach the sensor. Mirrorless cameras eliminate this mechanism entirely, making them lighter and more compact while offering electronic viewfinders that preview your exposure in real time.
For beginners specifically, mirrorless cameras offer some learning advantages through features like focus peaking and zebra stripes that highlight exposure issues. However, DSLRs still excel in several areas:
- Longer battery life due to optical viewfinders that don’t drain power
- More affordable used lenses available in mature lens systems
- Optical viewfinders with no lag or battery-dependent display
- Generally lower prices for comparable image quality
The Canon EOS R100 has become increasingly affordable, making it a compelling mirrorless option worth considering against DSLR alternatives.
Budget considerations and long-term value
Determining your budget involves more than just the camera body price. A complete photography kit includes several essential items beyond the camera itself.
Complete starter kit costs
Your initial investment should account for:
- Camera body and kit lens: 400 to 700 dollars
- Memory cards: 30 to 60 dollars for two 32GB cards
- Extra battery: 30 to 50 dollars
- Camera bag: 40 to 100 dollars
- Basic cleaning kit: 20 to 30 dollars
- Screen protector: 10 to 15 dollars
Additional accessories like a tripod, external flash, or lens filters can wait until you understand your specific needs. Starting simple prevents wasting money on gear you might never use.
Used camera bodies and lenses offer excellent value if you buy from reputable sources. A two-year-old camera typically costs 40 to 60 percent less than new while delivering nearly identical image quality. Camera technology improves gradually, not dramatically, so older models remain perfectly capable.
Building skills alongside equipment knowledge
The best camera for beginners is the one you’ll actually use consistently. Regular practice develops your photographic eye faster than reading endless tutorials or watching hours of YouTube videos.
Start with daily photography challenges that force you to see ordinary subjects creatively. Photograph the same location at different times of day to understand how light transforms scenes. Limit yourself to a single focal length for a week to learn the perspective it creates.
Understanding exposure triangle fundamentals (aperture, shutter speed, ISO) matters more than memorizing every menu option. These three variables control how much light reaches your sensor and how that light gets captured. Everything else in photography builds on this foundation.
When you’re ready to expand your knowledge beyond the camera body, exploring different lens options helps you understand how glass affects image quality and creative possibilities.
Where to find deals and save money
Camera prices fluctuate throughout the year based on new model releases and retail seasons. Black Friday and Cyber Monday typically offer the deepest discounts, with savings of 20 to 40 percent on camera kits common during this period.
Camera manufacturers release new models on predictable schedules, usually every 18 to 24 months. When a newer version launches, the previous generation drops in price significantly while offering virtually identical image quality for beginners. The Nikon D3500 replaced the Nikon D3400, which suddenly became an incredible value despite being an excellent camera.
For those planning major purchases, our Black Friday camera deals guide tracks the best offers and helps you avoid overpriced bundles filled with low-quality accessories.
Retailer bundles sometimes include useful accessories, but examine each item carefully. Many packages pad the perceived value with cheap tripods, memory cards, and camera bags that you’ll replace quickly. A bundle with a quality camera bag and fast memory cards offers better value than one with ten mediocre items.
The importance of learning resources
Camera manuals contain valuable information but rarely explain concepts in beginner-friendly language. Fortunately, extensive learning resources exist online, many specifically created for your exact camera model.
YouTube channels dedicated to photography education demonstrate techniques visually, making complex concepts easier to grasp than text explanations alone. Channels focusing on beginner photography often use the same camera models you’re considering, showing exactly which buttons to press and settings to adjust.
Online photography courses provide structured learning paths that build skills progressively. Free resources from camera manufacturers themselves often get overlooked despite offering model-specific guidance that generic courses cannot match.
Local camera clubs and photography meetups connect you with experienced photographers willing to share knowledge and provide feedback on your work. Learning from someone who can examine your images and explain specific improvements accelerates your development significantly.
Maintenance and care for longevity
Proper camera care extends your equipment’s lifespan and maintains image quality over years of use. Simple habits prevent expensive repairs and frustrating performance issues.
Sensor cleaning seems intimidating but becomes necessary as dust spots appear in your images. Professional cleaning costs 50 to 100 dollars, while doing it yourself requires a 30-dollar cleaning kit and careful technique. Most beginners should have sensors professionally cleaned annually.
Lens cleaning deserves regular attention because fingerprints, dust, and moisture degrade image quality. Use a rocket blower to remove loose particles before wiping, and invest in proper microfiber cloths rather than using shirt tails or paper towels that scratch lens coatings.
Storage and environmental protection
Camera bodies and lenses tolerate reasonable environmental conditions but suffer from extremes:
- Store equipment in a dry environment with stable temperature
- Use silica gel packets in your camera bag to control moisture
- Avoid sudden temperature changes that cause condensation
- Remove batteries during long-term storage to prevent corrosion
- Keep cameras away from direct sunlight when not in use
Weather-sealing varies between models, with entry-level DSLRs generally lacking the protection found in professional bodies. A simple rain cover costs 15 to 30 dollars and protects your investment during light rain or dusty conditions.
Final verdict: which beginner DSLR should you buy?
If I were buying a first DSLR today, I would decide by shooting style first and brand second. Pick the camera that removes the most friction from your first six months of practice, then spend the remaining budget on a clean kit lens, memory cards, a spare battery, and eventually one affordable prime lens.
- Choose the Nikon D3500 if you want the simplest still-photo learning path and excellent battery life.
- Choose the Canon Rebel T7 if you want the cheapest practical Canon DSLR starter kit.
- Choose the Canon Rebel SL3 if you want a small DSLR with better screen-based autofocus and occasional video.
- Choose the Nikon D5600 if you want a beginner DSLR with more autofocus coverage, a touchscreen, and room to grow.
Before checkout, price the whole starter kit rather than the camera body alone. A slightly older DSLR with a good 18-55mm lens, a fast SD card, and enough battery life to practice all weekend is usually a better first camera than a newer body that leaves no budget for the basics.
Beginner DSLR FAQ
Is a DSLR still worth buying for beginners in 2026?
Yes, if you want an optical viewfinder, long battery life, affordable used lenses, and a direct way to learn exposure fundamentals. Mirrorless cameras are the future of new camera development, but a good DSLR starter kit can still be a smart value if the price is right.
What is the best DSLR camera for a beginner on a budget?
The Canon Rebel T7 is usually the budget-friendly DSLR to compare first, especially if you find it bundled with the 18-55mm kit lens. The Nikon D3500 is often the stronger all-around learning camera if the price is close.
Should beginners buy a DSLR body only or a kit lens bundle?
Most beginners should buy the kit lens bundle. The 18-55mm lens is not glamorous, but it lets you learn wide, normal, and short telephoto framing before spending money on a lens you may not need.


