
Stepping into photography with a beginner Nikon DSLR opens up a world of creative possibilities that smartphones simply cannot match. The weight of a real camera in your hands, the satisfying click of the shutter, and the control you gain over every aspect of your images marks the beginning of a genuinely rewarding journey. Nikon has built a reputation spanning decades for producing reliable, user-friendly cameras that grow with photographers as their skills develop. Whether you’re drawn to landscape photography, portraits, or just capturing everyday moments with intention, understanding what makes these cameras tick will set you on the right path from day one.
Contents
- Why Nikon DSLRs still matter in 2026
- Choosing your first Nikon body
- Understanding the kit lens situation
- Mastering the exposure triangle
- Shooting modes explained simply
- Focusing fundamentals that actually work
- Essential settings to configure immediately
- Learning composition beyond the rule of thirds
- Shooting in different lighting conditions
- Video capabilities worth exploring
- Common beginner mistakes to avoid
- Exploring portrait photography basics
- Building sustainable photography habits
- Post-processing fundamentals
- Investing in your growth strategically
Why Nikon DSLRs still matter in 2026
The photography world has shifted dramatically toward mirrorless systems, but writing off DSLRs would be a mistake for beginners. The used market overflows with excellent Nikon bodies at prices that seem almost too good to be true, and the lens selection remains unmatched in both variety and affordability.
Battery life stands out as one major advantage. A beginner Nikon DSLR can shoot anywhere from 600 to 1,200 images on a single charge, while mirrorless cameras typically tap out around 300 to 400 shots. For someone learning the craft, spending less time worrying about battery levels and more time actually shooting makes a real difference.
The optical viewfinder deserves mention too. Looking through glass and mirrors to see exactly what your lens sees creates a direct connection that some electronic viewfinders still struggle to replicate. There’s no lag, no battery drain from the display, and it works perfectly in bright sunlight where screens can wash out.
Key advantages for beginners:
- Lower entry cost for body and lenses
- Extensive used market with thoroughly tested models
- Longer battery life for extended shooting sessions
- Optical viewfinders that work in all conditions
- Robust build quality that handles occasional bumps
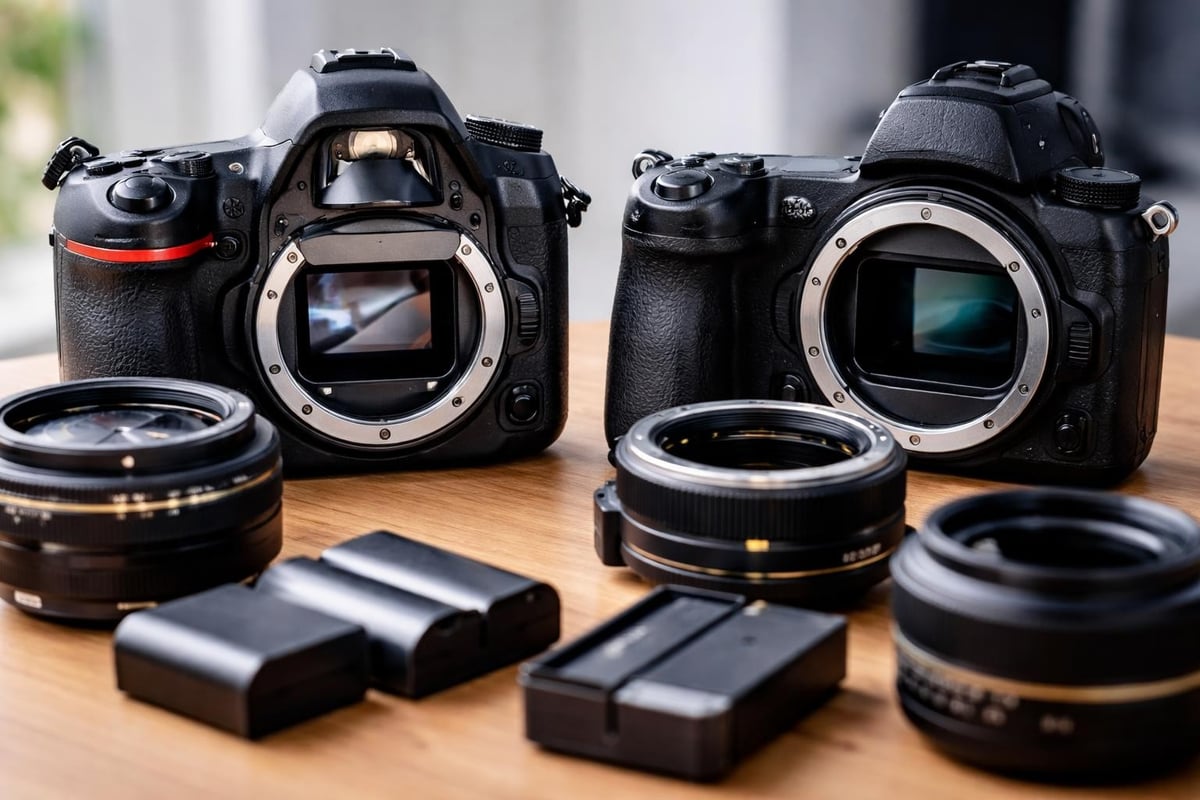
Choosing your first Nikon body
The D3500 and D5600 represent the sweet spot for newcomers in 2026. Both cameras feature 24-megapixel sensors that deliver crisp, detailed images suitable for everything from social media to large prints. The D3500 strips away some advanced features to keep the price low and the interface simple, which actually helps when you’re learning fundamentals.
The D5600 adds a tilting touchscreen, built-in WiFi, and a few extra autofocus points. These features become genuinely useful when you start exploring different shooting angles or want to transfer images to your phone quickly. The touchscreen makes menu navigation feel more intuitive if you’re coming from smartphone photography.
For those willing to explore the used market, the D7200 offers a significant step up in build quality and controls. Its dual SD card slots provide backup security for important shoots, and the deeper grip fits larger hands more comfortably during extended sessions.
| Model | Megapixels | Autofocus Points | Screen Type | Best For |
|---|---|---|---|---|
| D3500 | 24 | 11 | Fixed LCD | Absolute beginners on tight budgets |
| D5600 | 24 | 39 | Tilting touchscreen | Beginners wanting room to grow |
| D7200 | 24 | 51 | Fixed LCD | Serious beginners and enthusiasts |
Budget matters, but remember that investing slightly more upfront often saves money long term. A camera body that matches your ambition level means you won’t feel limited after six months of growth. Check out reviews of the best cameras under 700$ to see how these models stack up against competition from other brands.
Understanding the kit lens situation
Every beginner Nikon DSLR typically comes bundled with an 18-55mm kit lens, and the internet loves to trash these lenses. Here’s the truth: they’re actually decent optical tools that get unfairly criticized because they’re not exciting. The sharpness holds up well in good light, and the focal range covers everything from group shots to tighter portraits.
The real limitation shows up in low light. With a maximum aperture around f/3.5-5.6, these lenses struggle indoors or during evening events. You’ll find yourself pushing ISO higher than ideal, introducing noise into your images. But for daytime shooting and learning composition, exposure, and focusing techniques, the kit lens does the job.
After a few months, most photographers start eyeing the 35mm f/1.8G or 50mm f/1.8G prime lenses. These affordable additions transform your camera’s low-light capabilities and teach you about depth of field control in ways zoom lenses simply cannot. The fixed focal length forces you to move around your subject, developing your eye for composition naturally.
Building a versatile lens collection
Start with what you have, then add based on what you actually shoot rather than what you think you should shoot. If you find yourself constantly zooming to the longest end of your kit lens, a 70-300mm telephoto makes sense. Portrait photographers benefit more from that 50mm prime mentioned earlier.
The Nikon F-mount system spans decades, meaning incredible vintage glass remains available at bargain prices. Manual focus lenses from the 1980s and 1990s work perfectly on modern DSLRs with focus confirmation, though you’ll need to adjust aperture settings on the lens itself.
Recommended first additions:
- 35mm f/1.8G DX for everyday photography and low light
- 50mm f/1.8G for portraits and beautiful background blur
- 70-300mm for wildlife, sports, and distant subjects
- 10-20mm for landscapes and architecture
Mastering the exposure triangle
Every photograph requires balancing three elements: aperture, shutter speed, and ISO. Your beginner Nikon DSLR gives you complete control over these variables, but understanding how they interact takes practice and patience.
Aperture controls how much light enters through the lens opening and affects depth of field. A wide aperture like f/1.8 creates that creamy background blur everyone loves in portraits, while f/8 or f/11 keeps landscapes sharp from foreground to infinity. The numbers seem backward at first because they’re fractions, but you’ll internalize them quickly through use.
Shutter speed determines how long the sensor captures light. Fast speeds like 1/500th of a second freeze action, while slower speeds like 1/30th introduce motion blur. Hand-holding below 1/60th becomes challenging without image stabilization, and you’ll want to learn techniques for getting sharp shots when photographing movement.
ISO adjusts the sensor’s sensitivity to light. Low values like ISO 100 produce clean images but need more light, while high values like ISO 3200 work in dim conditions but add visible grain. Modern Nikon sensors handle noise remarkably well up to ISO 1600, giving you flexibility for indoor shooting.
Practical exposure scenarios
Shooting a portrait outdoors on a sunny day? Try f/2.8, 1/250th, ISO 100. The wide aperture blurs the background, the fast shutter freezes any movement, and low ISO keeps things clean.
Capturing a landscape at golden hour? Switch to f/8, 1/60th, ISO 400. The narrow aperture ensures sharpness throughout the scene, while you might need to bump ISO slightly as the sun sets.
Indoor event with mixed lighting? Consider f/2.8, 1/125th, ISO 1600. You’ll need that wide aperture and higher ISO to gather enough light, and 1/125th should freeze people who aren’t sprinting around.
| Scenario | Aperture | Shutter Speed | ISO | Priority |
|---|---|---|---|---|
| Bright outdoor portrait | f/2.8 | 1/250 | 100 | Shallow depth of field |
| Landscape sunset | f/8 | 1/60 | 400 | Overall sharpness |
| Indoor event | f/2.8 | 1/125 | 1600 | Freezing motion |
| Sports action | f/4 | 1/500 | 800 | Stopping movement |
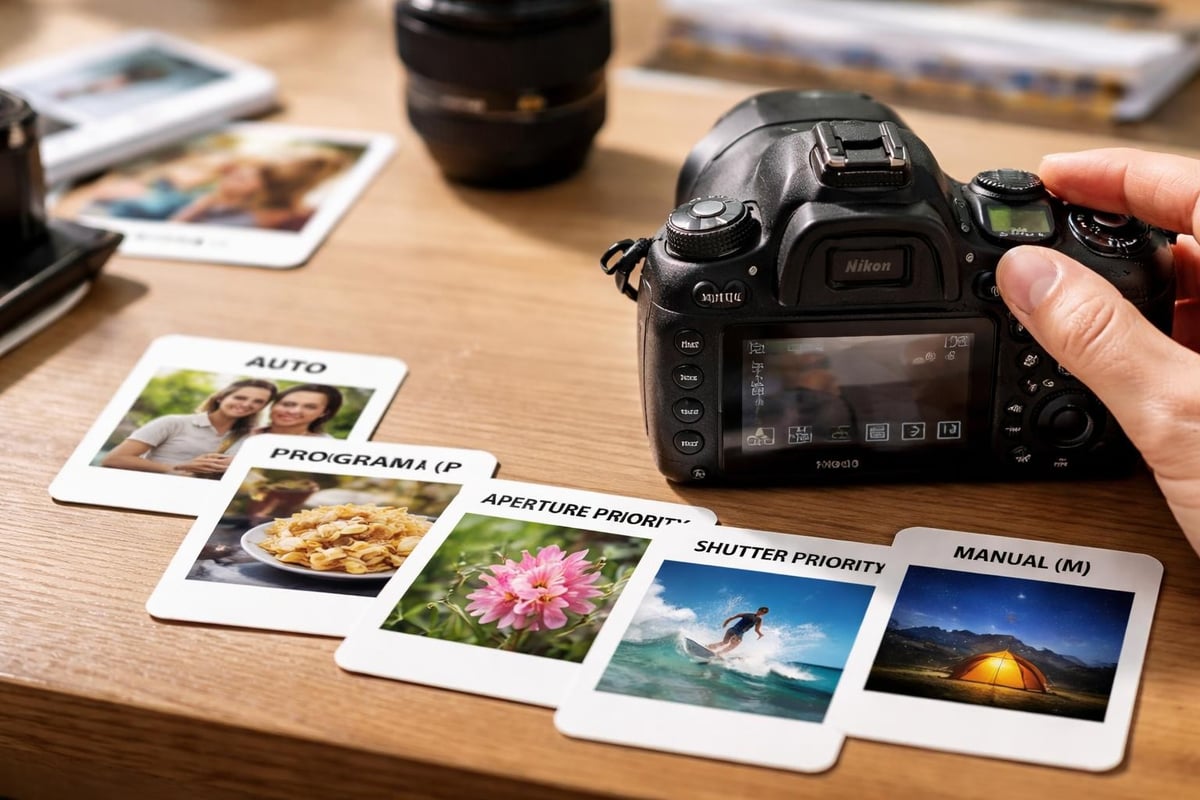
Shooting modes explained simply
That mode dial on top of your camera isn’t just decoration. Each setting serves a specific purpose, and understanding when to use each one accelerates your learning dramatically.
Auto mode analyzes the scene and makes all decisions for you. It’s fine for snapshots, but you’re basically using an expensive point-and-shoot. The camera often guesses wrong in tricky lighting or when you want creative control over depth of field.
Program mode (P) gives you slightly more input while the camera handles the technical heavy lifting. You can adjust the aperture and shutter speed combination the camera suggests, which helps when you’re still getting comfortable with the exposure triangle.
Aperture priority (A) lets you choose the aperture while the camera sets shutter speed automatically. This mode becomes invaluable for portraits where you want specific depth of field control or landscapes where you need everything sharp. Most photographers spend the majority of their time in this mode.
When to use each mode:
- Start your day in Program mode if you’re unsure
- Switch to Aperture priority when depth of field matters
- Use Shutter priority for sports and action
- Try Manual mode in consistent lighting situations
- Save Auto mode for genuine emergencies only
Shutter priority (S) flips the script by letting you control shutter speed while the camera adjusts aperture. Sports photographers and anyone shooting fast-moving subjects rely on this mode to ensure blur-free action shots.
Manual mode (M) puts you in complete control of all three exposure elements. Studio work, long exposures, and situations with consistent lighting benefit from manual settings. The learning curve feels steeper, but you’ll develop a deeper understanding of how your camera sees light.
Focusing fundamentals that actually work
Autofocus systems on modern Nikon DSLRs work remarkably well, but they’re not magic. Understanding the different focus modes prevents countless blurry photos and missed moments.
Single-servo AF (AF-S) locks focus when you half-press the shutter button. This mode works perfectly for stationary subjects like landscapes, posed portraits, and product photography. The camera won’t let you take a picture until it achieves focus, which sounds limiting but actually prevents frustration.
Continuous-servo AF (AF-C) tracks moving subjects by constantly adjusting focus as long as you hold the shutter halfway down. Kids, pets, sports, and wildlife photography demand this mode. Your beginner Nikon DSLR will work harder, and you’ll hear the lens elements moving as it tracks action.
The focus point selection matters just as much as the mode. Single-point AF gives you precise control by using just one of the available focus points. Multi-point AF lets the camera choose which points to use, which often means it focuses on the nearest object rather than your intended subject.
Practical focusing strategies
For portraits, switch to single-point AF and place that point directly on your subject’s nearest eye. Eyes should be razor-sharp in any portrait work, and this technique ensures you nail focus every time.
Landscapes benefit from manual focus in many cases. Switch your lens to MF, use live view, zoom in on the screen to check sharpness, and focus about one-third into the scene for maximum depth of field. Many Nikon models include helpful DSLR setup options like focus peaking to assist with manual focusing.
Action shots require continuous AF with the focus point placed where you expect your subject to be. Pre-focusing on a spot where the action will happen, like a finish line or jump location, often yields better results than trying to track erratically moving subjects.
Essential settings to configure immediately
Right out of the box, your beginner Nikon DSLR comes with default settings optimized for casual snapshots rather than intentional photography. Spending twenty minutes adjusting these options saves headaches later and improves your images immediately.
Set your image quality to RAW or RAW+JPEG. RAW files contain all the data your sensor captures, giving you incredible flexibility during editing. JPEGs bake in processing decisions that limit your ability to recover highlights, adjust white balance, or fix exposure mistakes. Yes, RAW files take more space, but memory cards cost pennies per gigabyte in 2026.
Configure your ISO settings to limit how high the camera will push sensitivity in auto ISO mode. Setting a maximum of ISO 3200 prevents the camera from creating overly noisy images in dim conditions. You can always override this manually when needed, but the safeguard helps maintain quality.
Adjust the autofocus mode to back-button focus if you’re ready for a slight learning curve. This separates focusing from the shutter button, letting you lock focus and recompose without the camera trying to refocus every time you press down. Many photographers consider this change transformative once they adapt.
Critical settings checklist:
- Image quality: RAW or RAW+JPEG
- Auto ISO maximum: 3200 or 6400 depending on your sensor
- Active D-Lighting: Off (handle this in editing)
- Picture Control: Standard or Neutral
- Release mode: Single frame or continuous low
Review Nikon’s official guide on understanding DSLR basics for more detailed explanations of each menu option and how they affect your final images.
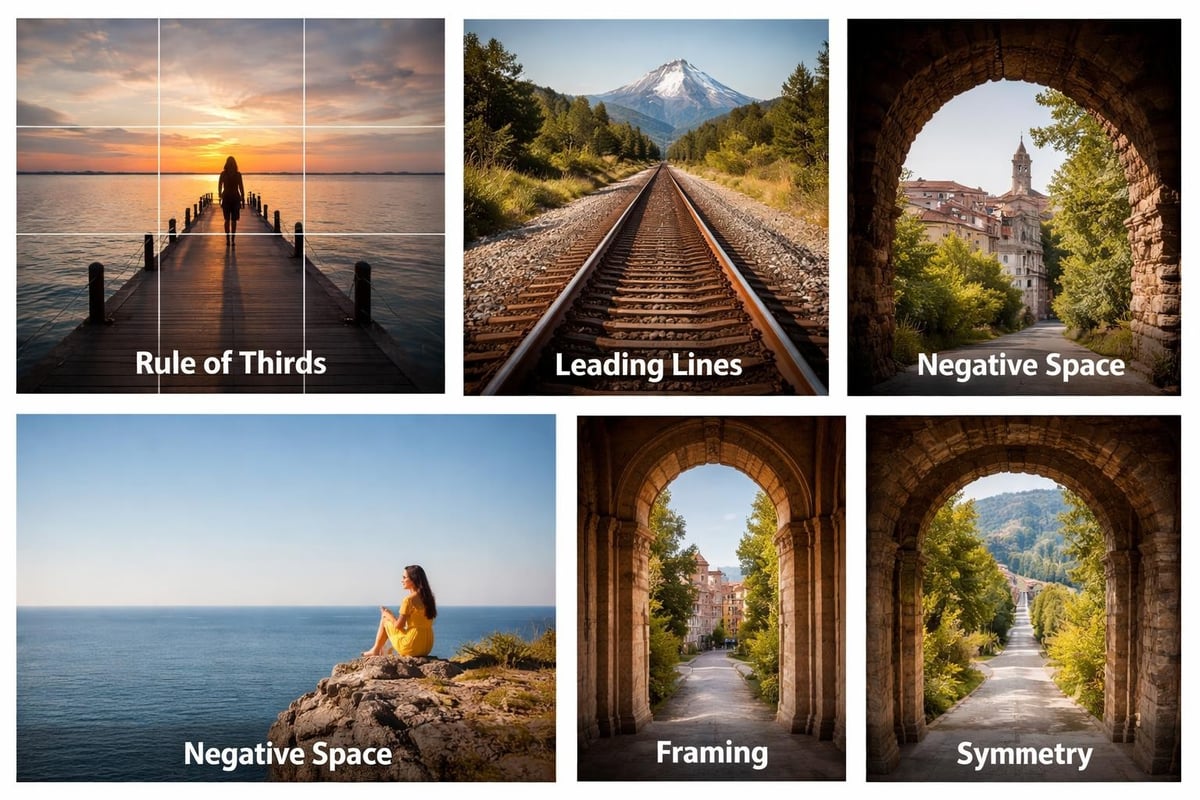
Learning composition beyond the rule of thirds
Every photography tutorial mentions the rule of thirds, placing subjects at intersection points of a nine-square grid. It works, but treating it as gospel creates boring, predictable images. Your beginner Nikon DSLR includes gridlines you can enable in the viewfinder, which helps initially but shouldn’t become a crutch.
Leading lines draw the viewer’s eye through the frame toward your main subject. Roads, rivers, fences, and architectural elements all create natural pathways that add depth and dimension to otherwise flat images. Look for these elements before you raise the camera.
Negative space gives subjects room to breathe and creates impact through simplicity. A small subject surrounded by empty sky, water, or solid color often carries more visual weight than a cluttered frame packed with elements competing for attention.
Developing your compositional eye
Frame within frames adds layers of interest by using doorways, windows, arches, or foliage to create natural borders around your subject. This technique works especially well in architectural and street photography.
Breaking conventional rules often produces the most striking images. Centering subjects can create powerful symmetry. Extreme close-ups eliminate context but emphasize texture and detail. Tilted horizons add energy and tension to action shots.
The best way to improve composition involves studying work you admire and asking why certain images grab your attention. Analyze the placement of elements, the use of light, the balance of colors, and the emotional response they trigger.
Shooting in different lighting conditions
Golden hour, that magical period just after sunrise and before sunset, makes everyone look like a competent photographer. The warm, soft light flatters subjects, creates long shadows, and adds atmosphere that harsh midday sun simply cannot match. Your beginner Nikon DSLR will love these conditions, producing beautiful colors with minimal effort.
Midday sun presents challenges with its harsh, overhead quality creating unflattering shadows on faces and blown-out highlights in landscapes. Move subjects into open shade, use fill flash, or embrace the contrast for dramatic black and white conversions. Sometimes the best decision involves waiting for better light rather than fighting against physics.
Blue hour, occurring just before sunrise and after sunset, offers moody, atmospheric conditions perfect for cityscapes and landscapes. You’ll need to bump ISO and slow shutter speeds, often requiring a tripod for sharp results. The color palette shifts toward cool blues and purples that create an otherworldly quality.
Managing difficult lighting scenarios
Backlit subjects require either fill flash, exposure compensation, or accepting a silhouette. Spot metering on your subject’s face tells the camera to expose for them rather than the bright background, though this often blows out the sky completely.
Indoor mixed lighting creates white balance nightmares. Tungsten bulbs cast orange, fluorescents lean green, and windows introduce blue daylight. Shooting RAW saves you here because white balance becomes a simple slider adjustment rather than a permanent mistake.
Nikon provides excellent resources for improving your photography across different conditions, including these top photography tips that cover focusing, composition, and exposure techniques specifically for their cameras.
Video capabilities worth exploring
Modern beginner Nikon DSLR models shoot 1080p video that looks remarkably good, though they lag behind mirrorless options in autofocus performance and features. The video mode introduces different considerations than still photography, but the fundamentals remain similar.
Frame rate matters for the look and feel of your footage. 24fps creates that cinematic quality you recognize from movies, 30fps works well for general-purpose video, and 60fps allows smooth slow-motion playback when slowed to 24fps or 30fps in editing.
Manual mode becomes essential for video because you cannot have exposure changing mid-shot as the camera reacts to brightness fluctuations. Lock in your settings before hitting record, and use ND filters to maintain proper shutter speed in bright conditions.
Video shooting basics:
- Set shutter speed to double your frame rate
- Use manual focus or face tracking when available
- Monitor audio levels with headphones
- Stabilize with a tripod or gimbal
- Shoot in short clips rather than long takes
External microphones dramatically improve audio quality over the built-in mic, which picks up every lens movement and camera operation noise. Even an inexpensive shotgun mic mounted on the hot shoe elevates production value significantly.
Those interested in DSLR video should check Nikon’s guide on gear selections for video beginners, which covers specific equipment and techniques for getting started with video on your camera.
Common beginner mistakes to avoid
Shooting everything in Auto mode wastes the potential of your beginner Nikon DSLR and slows your learning progression. Challenge yourself to use semi-automatic modes even when you’re not confident. Mistakes teach more than safe, perfect shots.
Chimping after every single frame disrupts your rhythm and causes you to miss moments. Review images periodically to check exposure and composition, but trust your settings and keep shooting. Memory cards hold thousands of images, so there’s no need to verify each one immediately.
Ignoring the histogram in favor of the LCD preview leads to exposure problems you won’t notice until you’re home editing. Screens look different in various lighting conditions, but the histogram provides objective data about your exposure distribution. Learn to read it and trust it over your eyes.
Setting yourself up for success
Skipping proper lens cleaning affects image quality more than you’d think. Dust, fingerprints, and smudges reduce contrast and create flare in backlit conditions. Carry a microfiber cloth and lens cleaning solution, using them regularly rather than waiting until lenses look obviously dirty.
Not backing up images remains the biggest preventable disaster. Hard drives fail, cards corrupt, and accidents happen. Maintain at least two copies of important images on separate devices or cloud storage. The first time you lose irreplaceable photos teaches this lesson harshly.
Comparing your early work to experienced photographers’ portfolios kills motivation faster than anything else. Everyone starts somewhere, and those stunning images you admire represent years of practice, failed attempts, and learned lessons. Focus on your own progress month over month instead.
Exploring portrait photography basics
Portraits demand different technical considerations than landscapes or street photography. Your beginner Nikon DSLR excels at portraits once you understand a few key principles about focal length, aperture, and light direction.
The 50mm lens on a crop sensor DSLR provides roughly 75mm equivalent field of view, which flatters facial features by slightly compressing perspective. Wider angles exaggerate features closest to the camera, while telephoto compression creates more pleasing proportions. This explains why kit lenses at 18-24mm produce unflattering portraits despite being sharp.
Aperture selection balances background blur with facial sharpness. Shooting wide open at f/1.8 creates beautiful bokeh but risks having one eye sharp while the other falls slightly soft. Stopping down to f/2.8 or f/4 provides enough depth of field for complete facial sharpness while maintaining subject separation from the background.
Light direction shapes mood and dimension in portraits. Front lighting from slightly above creates even, flattering illumination. Side lighting adds drama and emphasizes texture. Backlighting creates rim light and separation but requires fill flash or reflectors to prevent silhouettes.
For additional guidance, Nikon’s portrait photography tips cover lens selection, aperture settings, and composition techniques specific to capturing people effectively.
Building sustainable photography habits
Consistency matters more than intensity when developing photography skills. Shooting for thirty minutes daily teaches more than occasional marathon sessions once monthly. Your beginner Nikon DSLR should become an extension of how you see the world rather than special equipment reserved for occasions.
Project-based learning accelerates growth by providing structure and purpose. Commit to photographing a specific subject for thirty days, exploring it from every angle and in various conditions. The constraints force creative solutions and deeper observation than random shooting ever achieves.
Effective practice projects:
- Photograph the same location at different times of day
- Create a series around a single color
- Document a personal daily routine for a month
- Explore textures and patterns in your neighborhood
- Practice portraits with willing friends or family
Seeking feedback from other photographers provides perspective your own eyes cannot. Join local camera clubs, post in online forums, or find photography groups on social media. Constructive criticism stings initially but accelerates improvement dramatically when you learn to separate ego from craft.
Studying photography beyond camera operation deepens your understanding of the medium. Books on composition, lighting, the history of photography, and the work of master photographers inform your own vision and provide context for your creative decisions.
Post-processing fundamentals
RAW files require editing to reach their potential, unlike JPEGs that receive in-camera processing. This doesn’t mean heavy manipulation or artificial effects, but rather developing the image data into a finished photograph that matches your creative vision.
Lightroom and Capture One dominate the editing landscape for good reasons. Both offer non-destructive workflow, batch processing capabilities, and organizational tools that become essential as your image library grows. Nikon’s free Capture NX-D works well for basic adjustments if you’re avoiding subscription costs.
Basic adjustments follow a logical order for consistent results. Start with exposure and white balance corrections, move to contrast and highlights/shadows recovery, adjust color and vibration, apply sharpening and noise reduction, then finish with any cropping or perspective corrections.
Essential editing steps
Exposure adjustment recovers details in highlights and shadows your camera couldn’t capture in a single shot. Modern sensors contain impressive dynamic range that editing unlocks. Push those sliders further than feels comfortable initially, learning the limits of your camera’s files.
White balance correction ensures colors look natural rather than too warm or cool. The eyedropper tool helps by sampling a neutral gray area in your image, though manual adjustment with the temperature and tint sliders often yields better results.
Sharpening and noise reduction balance detail against smoothness. Apply sharpening selectively to edges and important details rather than uniformly across the frame. Noise reduction saves high ISO shots but can eliminate fine detail if pushed too aggressively.
Investing in your growth strategically
Photography gear tempts with constant upgrades and additions, but your beginner Nikon DSLR remains capable long after you’ve outgrown its limitations. Spending money on education, travel, or experiences that put you in interesting locations often yields better images than new equipment.
Books, workshops, and online courses from accomplished photographers teach techniques and perspectives you won’t discover through trial and error alone. The investment in knowledge compounds over your entire photography journey rather than becoming obsolete like gear eventually does.
That said, certain accessories genuinely improve your capabilities and results. A sturdy tripod enables long exposures, sharp landscapes, and consistent product photography. External flash units provide portable light for events and portraits. Graduated ND filters help balance exposures in high-contrast landscape situations.
| Accessory | Purpose | Priority Level | Approximate Cost |
|---|---|---|---|
| Tripod | Stability for long exposures | High | $100-200 |
| 50mm f/1.8 lens | Low-light and portraits | High | $200 |
| External flash | Event and portrait lighting | Medium | $150-300 |
| Extra batteries | Extended shooting sessions | High | $30-50 |
| Memory cards | Storage and backup | High | $20-40 |
| Camera bag | Protection and transport | Medium | $50-150 |
Memory cards deserve special mention because failure means lost images. Buy from reputable brands, avoid suspiciously cheap cards from unknown sellers, and replace cards every few years before they fail. The money saved on sketchy cards costs infinitely more than properly stored images.
Practice and experience trump equipment every time. A skilled photographer with a basic beginner Nikon DSLR produces better results than someone with professional gear and limited understanding. Focus your energy on shooting regularly, studying light, understanding composition, and developing your unique vision.
Starting with a beginner Nikon DSLR puts powerful creative tools in your hands while offering room to grow as your skills develop. The journey from uncertain beginner to confident photographer happens through consistent practice, thoughtful experimentation, and learning from both successes and failures. Whether you’re exploring Lens and Shutter for detailed camera reviews, comparing lens options, or researching accessories to expand your capabilities, having trusted resources makes the path smoother and helps you make informed decisions that match your photographic goals.


